
-
Email:zhao@hyliec.cn
-
Tel:+86 311 85273988
-
WhatsAPP:8613931128750
-
 Afrikaans
 -
 Albanian
 -
 Amharic
 -
 Arabic
 -
 Armenian
 -
 Azerbaijani
 -
 Basque
 -
 Belarusian
 -
 Bengali
 -
 Bosnian
 -
 Bulgarian
 -
 Catalan
 -
 Cebuano
 -
 Corsican
 -
 Croatian
 -
 Czech
Czech -
 Danish
 -
 Dutch
Dutch -
 English
 -
 Esperanto
 -
 Estonian
 -
 Finnish
 -
 French
 -
 Frisian
 -
 Galician
 -
 Georgian
 -
 German
 -
 Greek
Greek -
 Gujarati
 -
 Haitian Creole
 -
 hausa
hausa -
 hawaiian
 -
 Hebrew
 -
 Hindi
Hindi -
 Miao
Miao -
 Hungarian
 -
 Icelandic
 -
 igbo
igbo -
 Indonesian
 -
 irish
irish -
 Italian
 -
 Japanese
 -
 Javanese
 -
 Kannada
 -
 kazakh
 -
 Khmer
Khmer -
 Rwandese
 -
 Korean
 -
 Kurdish
 -
 Kyrgyz
 -
 Lao
Lao -
 Latin
Latin -
 Latvian
 -
 Lithuanian
 -
 Luxembourgish
 -
 Macedonian
 -
 Malgashi
 -
 Malay
Malay -
 Malayalam
 -
 Maltese
 -
 Maori
Maori -
 Marathi
 -
 Mongolian
 -
 Myanmar
 -
 Nepali
 -
 Norwegian
 -
 Norwegian
 -
 Occitan
 -
 Pashto
 -
 Persian
 -
 Polish
 -
 Portuguese
 -
 Punjabi
 -
 Romanian
 -
 Russian
 -
 Samoan
 -
 Scottish Gaelic
 -
 Serbian
 -
 Sesotho
 -
 Shona
Shona -
 Sindhi
 -
 Sinhala
 -
 Slovak
 -
 Slovenian
 -
 Somali
 -
 Spanish
 -
 Sundanese
 -
 Swahili
 -
 Swedish
 -
 Tagalog
 -
 Tajik
Tajik -
 Tamil
Tamil -
 Tatar
Tatar -
 Telugu
 -
 Thai
Thai -
 Turkish
 -
 Turkmen
 -
 Ukrainian
 -
 Urdu
Urdu -
 Uighur
 -
 Uzbek
Uzbek -
 Vietnamese
 -
 Welsh
Welsh -
 Bantu
Bantu -
 Yiddish
 -
 Yoruba
 -
 Zulu
Zulu
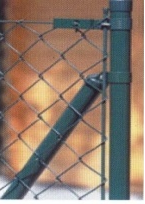
tensioning chicken wire
Tensioning Chicken Wire A Guide to Effective Fencing
In the world of homesteading and backyard farming, chicken wire serves as an essential tool for keeping your feathered friends safe while allowing them to roam and explore. Properly tensioning chicken wire is crucial to ensuring its effectiveness in protecting your chickens from predators and preventing them from escaping. In this article, we’ll explore the best practices for tensioning chicken wire, along with key considerations to keep in mind during the installation process.
Understanding Chicken Wire
Before delving into the tensioning process, it’s important to understand what chicken wire is. Typically made from galvanized steel, chicken wire consists of thin wire strands woven together to form a hexagonal mesh. Although it's often regarded as a less robust fencing option compared to welded wire or electric fencing, it remains a popular choice for poultry and small animal enclosures due to its affordability and ease of installation.
Preparation for Installation
1. Choose the Right Location Select a suitable area for your chicken coop or run, ensuring it is free from large trees or other structures that might provide shelter to predators.
3. Measure Your Space Before purchasing materials, measure the perimeter of the area you wish to enclose. This ensures you buy the right amount of chicken wire, helping to avoid unnecessary cuts and waste.
Installing and Tensioning Chicken Wire
1. Set the Posts Begin by setting up the vertical posts, which should be spaced no more than 6 to 8 feet apart. Use wood or metal posts that are sturdy enough to withstand tension.
tensioning chicken wire
2. Attach the Chicken Wire Starting at one corner, unroll the chicken wire across the posts. Make sure the bottom edge is buried slightly in the ground to deter digging predators.
3. Tension the Wire As you attach the chicken wire to the posts, ensure that it is taut. This is where the tensioning tool comes into play. Use it to pull the wire tight at each corner and along the length of the run. A well-tensioned fence will not sag, which could create gaps for predators or allow chickens to escape.
4. Secure the Wire Once the wire is tense, securely fasten it to each post using staples or nails. Ensure that the wire is held firmly in place but be careful not to over-tighten, as this could cause the wire to break.
5. Inspect for Gaps After installation, walk the perimeter and inspect for any sagging or gaps. Any flaws in the fencing can be dangerous for your chickens. Reinforce these areas as necessary to ensure a secure enclosure.
Maintenance and Considerations
Regular maintenance of your chicken wire fence is essential for its longevity and effectiveness. Check for rust, loose connections, and signs of wear. Over time, environmental factors may cause the wire to loosen, so be proactive about retightening and repairing as needed.
Additionally, while chicken wire is excellent for keeping chickens contained, it’s not foolproof against determined predators. Consider reinforcing your fencing with buried barriers or electric fencing for added security, especially in areas known for wildlife encounters.
Conclusion
Tensioning chicken wire is a crucial step in building a safe and secure environment for your chickens. By following the right practices during installation and regularly maintaining your fence, you can enjoy peace of mind knowing that your feathered companions are safe from predators. With a little effort, your chicken coop can become a thriving space where your birds can thrive and produce eggs for all to enjoy.