
-
Email:zhao@hyliec.cn
-
Tel:+86 311 85273988
-
WhatsAPP:8613931128750
-
 Afrikaans
 -
 Albanian
 -
 Amharic
 -
 Arabic
 -
 Armenian
 -
 Azerbaijani
 -
 Basque
 -
 Belarusian
 -
 Bengali
 -
 Bosnian
 -
 Bulgarian
 -
 Catalan
 -
 Cebuano
 -
 Corsican
 -
 Croatian
 -
 Czech
Czech -
 Danish
 -
 Dutch
Dutch -
 English
 -
 Esperanto
 -
 Estonian
 -
 Finnish
 -
 French
 -
 Frisian
 -
 Galician
 -
 Georgian
 -
 German
 -
 Greek
Greek -
 Gujarati
 -
 Haitian Creole
 -
 hausa
hausa -
 hawaiian
 -
 Hebrew
 -
 Hindi
Hindi -
 Miao
Miao -
 Hungarian
 -
 Icelandic
 -
 igbo
igbo -
 Indonesian
 -
 irish
irish -
 Italian
 -
 Japanese
 -
 Javanese
 -
 Kannada
 -
 kazakh
 -
 Khmer
Khmer -
 Rwandese
 -
 Korean
 -
 Kurdish
 -
 Kyrgyz
 -
 Lao
Lao -
 Latin
Latin -
 Latvian
 -
 Lithuanian
 -
 Luxembourgish
 -
 Macedonian
 -
 Malgashi
 -
 Malay
Malay -
 Malayalam
 -
 Maltese
 -
 Maori
Maori -
 Marathi
 -
 Mongolian
 -
 Myanmar
 -
 Nepali
 -
 Norwegian
 -
 Norwegian
 -
 Occitan
 -
 Pashto
 -
 Persian
 -
 Polish
 -
 Portuguese
 -
 Punjabi
 -
 Romanian
 -
 Russian
 -
 Samoan
 -
 Scottish Gaelic
 -
 Serbian
 -
 Sesotho
 -
 Shona
Shona -
 Sindhi
 -
 Sinhala
 -
 Slovak
 -
 Slovenian
 -
 Somali
 -
 Spanish
 -
 Sundanese
 -
 Swahili
 -
 Swedish
 -
 Tagalog
 -
 Tajik
Tajik -
 Tamil
Tamil -
 Tatar
Tatar -
 Telugu
 -
 Thai
Thai -
 Turkish
 -
 Turkmen
 -
 Ukrainian
 -
 Urdu
Urdu -
 Uighur
 -
 Uzbek
Uzbek -
 Vietnamese
 -
 Welsh
Welsh -
 Bantu
Bantu -
 Yiddish
 -
 Yoruba
 -
 Zulu
Zulu
Designing a 50x50% Fence Post for Optimal Durability and Aesthetic Appeal
The Essential Guide to Building a 50x50% Fence Post
When it comes to landscaping and enhancing the security of your property, building a fence is often one of the most effective solutions. A well-constructed fence not only serves as a boundary marker but also offers privacy and protection for your home. One of the critical components of any fence construction is the fence post, especially when planning to use a 50x50% design. This article aims to provide you with an in-depth guide on building a sturdy 50x50% fence post, ensuring your fence stands the test of time while adding value to your property.
Understanding the 50x50% Fence Post
The term 50x50% refers to the dimensions and reinforcement methodology of the fence post. It essentially indicates a fence post that is 50 mm by 50 mm in cross-section, with a respective depth and spacing strategy that allows for effective installation and durability. The percentage might reference the proportion of the post that is anchored below ground versus above ground, ensuring that the structure not only rises high enough to provide visibility and security but is also solid and stable.
Materials Required
Before you start building, gather the materials you will need. For a 50x50% fence post, you will require
- Fence Posts Treated wood, PVC, or metal options. - Concrete Mix To secure the posts in the ground. - Measuring Tape For accurate measurements. - Post Hole Digger or Auger For digging holes. - Level To ensure posts are straight. - Saw If adjustments are needed for post height. - Gravel For drainage at the bottom of the post hole.
Step-by-Step Construction
1. Planning and Measurement Start by determining where you would like your fence to be located. Use a measuring tape to mark out where each post will go. The distance between each post depends on the type of fence you’re building—generally, 6 to 8 feet apart is typical.
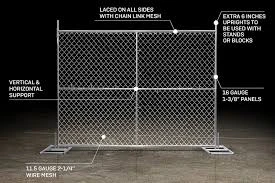
50x50 fence post
2. Digging the Holes Using a post hole digger or auger, create holes that are about one-third the length of your fence post deep. For a standard 6-foot tall post, this means digging about 2 feet deep.
3. Adding Gravel Place a few inches of gravel at the bottom of each hole for drainage. This protects the post from rotting by aiding in moisture control.
4. Setting the Posts Place your 50x50 posts into the holes. Ensure that they are vertically straight using a level. Once positioned, fill the hole with concrete mix, ensuring it surrounds the post for stability.
5. Waiting for Concrete to Set Allow the concrete to cure for at least 24-48 hours. This waiting period allows the post to become securely anchored.
6. Trimming and Finishing Touches After the concrete has set, trim any excess height from the posts if necessary. You can also choose to paint or stain the posts for added aesthetics and protection.
Final Considerations
When constructing a fence, maintenance is key. Check the posts regularly for any signs of leaning, rotting, or wear and tear. Treating your wood posts with protective coatings can help extend their lifespan.
In conclusion, building a 50x50% fence post may seem like a daunting task, but with the right materials and careful attention to detail, it can be a manageable project. Whether you are enhancing your property’s aesthetics or improving security, a sturdy fence supported by properly installed posts will serve you well for years to come. Remember that proper planning, execution, and maintenance are crucial to achieving a successful and lasting fence installation. Happy fencing!
-
Well Casing Extension Couplings – Applications and Installation
NewsMay.19,2025
-
Stylish Garden Gates for Sale – Enhance Your Outdoor Space
NewsMay.19,2025
-
Fencing Wire Roll Maintenance – How to Make It Last Longer
NewsMay.19,2025
-
Different Types of Fence Posts for Various Fencing Needs
NewsMay.19,2025
-
Creative Ways to Use Panel Fencing in Your Garden
NewsMay.19,2025
-
Plant Supports Wholesale
NewsMay.13,2025